

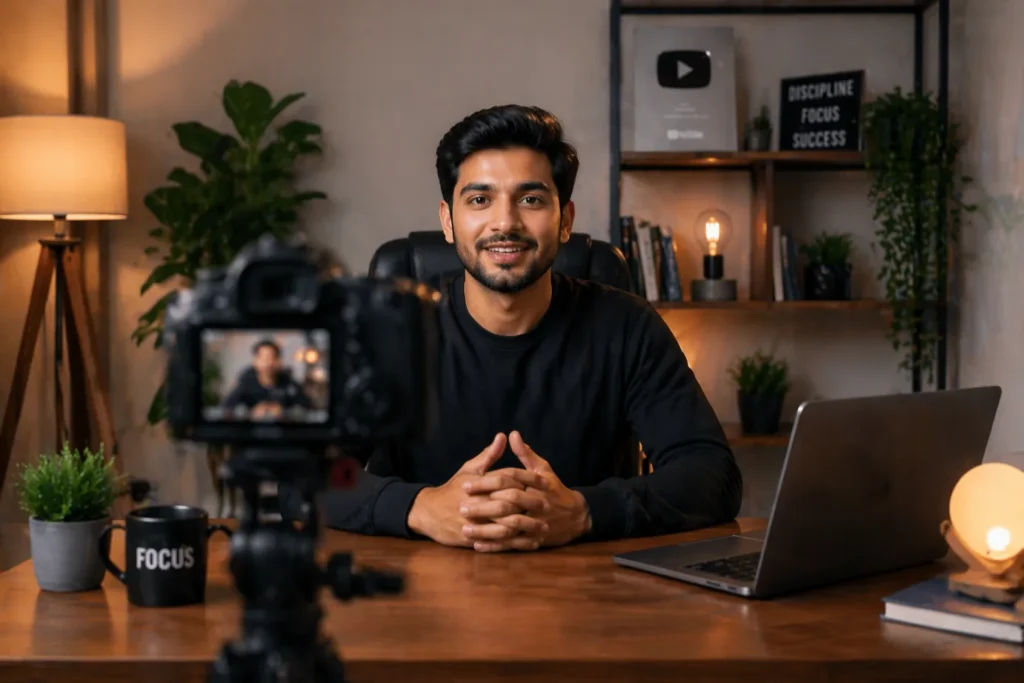
Setting up the perfect camera setup for YouTube at home feels exciting at first. But sitting down to film and not knowing where to begin? That part is frustrating. You stare at your camera, adjust it five times, and the footage still looks off. Fortunately, a great-looking video does not require a professional studio. Most successful creators film right from their bedroom or home office. So, you just need to know what to do and in what order.
This guide walks you through every step, from camera angle to background setup. Whether you are a total beginner or someone looking to improve, this is for you.
Essential Camera Setup Steps for YouTube Videos
Let us start with the basics. These five steps form the foundation of any solid camera setup for YouTube videos.
Place Camera at Eye Level
Your camera should sit at the same height as your eyes. This is one of the most overlooked things beginners get wrong. When the camera looks up at you, it feels awkward. When it looks down, you appear distant. Instead, eye level creates a natural connection with your viewer. It feels like a real conversation. Use a stack of books, a box, or an adjustable desk mount. In fact, even small changes here make a big visible difference.
Use a Tripod for Stability
Shaky footage instantly kills the viewer's experience. A tripod solves this completely. You do not need an expensive one to start. A basic tripod stand under PKR. 4,000 gives you steady, clean shots. Place it about two to four feet in front of you. Lock it firmly before hitting the record.
Additionally, if you are filming headshots for thumbnails or profile content, a tripod also helps you frame the perfect close-up without someone else holding the camera.
Adjust Lighting Position
Light should face you, not come from behind. Backlight turns you into a silhouette. Therefore, position your light source in front and slightly above eye level. This lights your face evenly and reduces harsh shadows. We will go deeper into lighting setups in a later section.
Set Up External Microphone
Your built-in camera microphone picks up everything, including room noise, AC hums, and echoes. Viewers tolerate average video but rarely tolerate bad audio. This is why a wireless mic setup gives you freedom to move while keeping your audio clean and consistent. Clip-on lapel mics are affordable and easy to use. If you record at a desk, a USB condenser mic works great too.
Check Framing and Background
Before pressing record, look at your full frame. What is behind you? Is it messy, distracting, or too empty? Your background should support your content, not fight against it. Also, check that there is some space above your head in the frame.
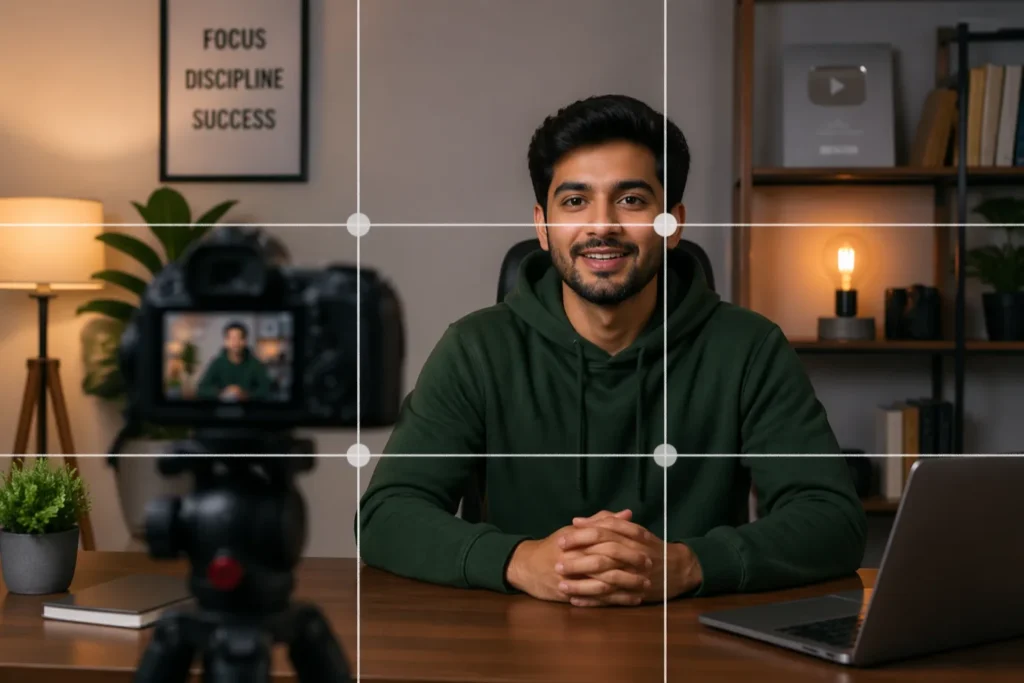
When it comes to positioning yourself, apply the rule of thirds, a compositional principle that divides your frame into nine equal sections through two horizontal and two vertical lines. Rather than placing yourself dead center, align your body along one of these vertical lines. This subtle off-center placement creates a more polished, visually dynamic shot that immediately feels more intentional and professional.
Best Camera Position for YouTube Videos
Camera position affects how viewers feel watching your video. It is not just about height.
- Distance matters too: For talking-head videos, sit close enough that your face and shoulders fill most of the frame. Too far away makes you look small and impersonal.
- Angle matters: A slight downward angle, maybe five to ten degrees, can be flattering. Straight-on at eye level is always a safe, clean option.
- Avoid filming in front of a window: Natural light from behind you creates exposure problems. The camera adjusts to the bright background and darkens your face.
- Use depth of field (bokeh): If you use a DSLR or a mirrorless camera, take advantage of its ability to blur the background. This draws attention to your face and makes even simple home setups look cinematic. For example, a portrait lens like a 50mm or 85mm works beautifully for this effect.
Lighting Setup for YouTube Videos
Lighting makes or breaks your video. Good lighting can make a phone camera look professional. On the other hand, bad lighting can ruin footage from an expensive camera.
Here are three practical setups based on budget and space.
Natural Light Setup
This is the simplest and most budget-friendly option. Sit facing a window during the daytime. The soft, diffused light from outside naturally flatters your face. However, avoid direct sunlight. It creates harsh shadows and changes throughout the day. Overcast days actually produce the most even, flattering light.
Tip: Keep the window in front of you, not to the side. Side light creates one bright cheek and one dark cheek, which looks uneven on camera.
Basic 2 Light Setup
When natural light is not consistent, two lights give you control. Place your key light in front and slightly to one side. This is your main light source. Then, place a second softer light on the other side to reduce shadows. This two-light approach works for most home studio setups and is very beginner-friendly.
Tip: Ring lights work well as your key light in this setup. They are affordable, easy to position, and widely used by home studio creators. Pair it with a softer secondary light on the opposite side to complete the two-light setup
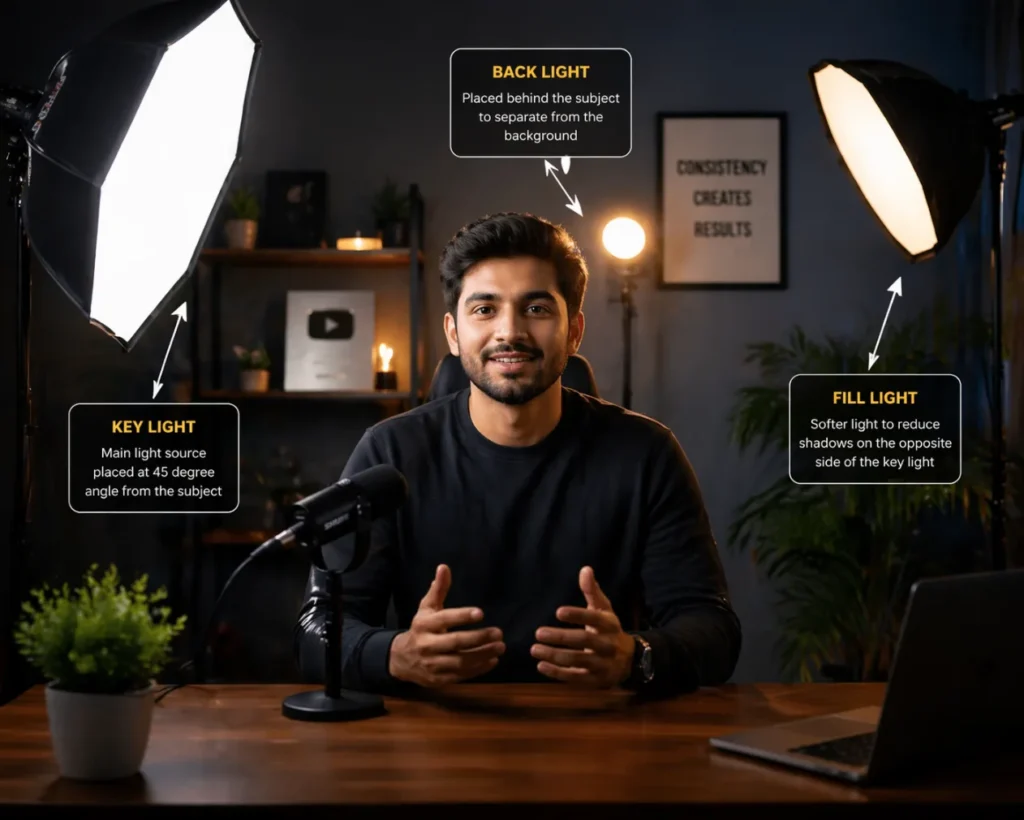
3 Point Lighting Setup
This is the gold standard for best lighting for YouTube videos. It uses three lights for a polished, studio-quality look.
First is the key light, your brightest and main source. Second is the fill light, placed on the opposite side to soften shadows created by the key. Third is a backlight positioned behind you, pointing at your shoulders or hair. The backlight separates you from the background and adds depth. This setup takes a little more effort to arrange but the results are noticeably better.
Tip: Set your key light at a 45-degree angle, fill light at lower intensity on the opposite side, and keep your backlight subtle to avoid overpowering the shot.
Hope Enterprises works with content creators and businesses to design exactly this kind of professional lighting and camera setup for home studios and commercial productions.
Audio Setup for YouTube Recording
Let us be honest. You can watch a video with average picture quality. But you will click away from a video with poor audio in seconds.
Here is what a good audio setup looks like at home.
- Reduce room echo first: Bare walls and hard floors create reverb. Therefore, add some soft furnishings, bookshelves, rugs, or curtains. These absorb sound and make your recordings cleaner.
- Choose the right microphone for your style: If you move around while filming, a wireless lapel mic is ideal. Alternatively, if you sit at a desk, a condenser mic on a boom arm keeps it out of frame while delivering rich, clear sound.
- Monitor your audio before filming: Do a 30-second test recording. Put on headphones and listen. Is there background noise? Is your voice too quiet or too loud? Fix it before the full take.
- Record in a quiet room: Turn off fans, close windows, and let people in your home know you are recording. Small steps make a big difference in audio quality.
Background Setup for YouTube Videos
Your background communicates a lot about you. Viewers make instant judgments based on what they see behind you.
- Keep it purposeful: A bookshelf with interesting titles works well for educators. A plant-filled corner feels warm and approachable. A simple, clean wall with good lighting is always safe.
- Avoid visual clutter: Too many objects pull the viewer's attention away from you. Less is almost always more.
- Consider a virtual background carefully: They work fine for casual content but often look artificial on camera. If you use one, make sure your lighting is even. Uneven lighting creates a halo effect that looks messy.
- Add personal touches: A few items that reflect your brand or personality make the background interesting without being distracting. Think one or two relevant props, a logo, or branded colors on the wall.
Camera Settings for YouTube Videos
This is where beginners often feel overwhelmed. But once you understand a few key settings, it clicks fast. So, start with camera settings for beginners and build from there.
- Aperture (f-stop): This controls how much light enters the lens. It also affects background blur. A lower f-number like f/1.8 lets in more light. It also creates more blur behind you. A higher number like f/8 keeps everything sharp and in focus.
- Shutter Speed: This controls motion blur in your video. For YouTube videos, set your shutter speed to double your frame rate. If you film at 30fps, use 1/60. This gives your footage a natural, cinematic look.
- ISO Sensitivity: ISO controls brightness in low light. Keep it as low as you can. High ISO adds grain to your video. This reduces overall quality. As a result, ISO 100 to 800 is usually the safe range for home setups with decent lighting.
- White Balance: This adjusts how warm or cool your colors look. Auto white balance works fine in most cases. But if your lighting changes mid-video, set it manually. Match it to your light source. This gives you consistent, accurate skin tones throughout.
- 4K vs 1080p: Start with 1080p at 30fps. It is easier to edit. It takes less storage. It also looks sharp on most screens. Move to 4K when you have more storage, a faster computer, and a clear reason for it.
-
Continuous Autofocus: Turn this on if your camera supports it. It keeps your face sharp as you move. This works even when you lean forward, turn slightly, or shift in your seat. Furthermore, eye-tracking autofocus on newer cameras is especially useful for solo creators filming without a camera operator.
Common Camera Setup Mistakes
Even experienced creators make these mistakes. Here is what to avoid.
- Filming with a Window Behind You: Window behind you washes out your face completely. Make sure to face your light source.
- Skipping Audio Checks: Skipping audio checks is a mistake most creators regret. Do a test recording first.
- Placing the Camera Too Low: A camera below chin level is unflattering. Aim for eye level or slightly above.
- Ignoring Background Distractions: A messy background sends the wrong message. Take two minutes to tidy before filming.
- Using Auto Settings for Everything: Auto mode is fine to start, but manual settings give better consistency and control.
- Not Using a Tripod: Handheld footage suits vlogs, but talking-head videos need a stable tripod every time.
-
Forgetting to Check Focus: Soft focus ruins an otherwise perfect video. Tap to focus on your face first.
Best Equipment for YouTube Setup
You do not need the most expensive gear. You need the right gear for where you are right now.
Camera: A modern smartphone with a good rear camera is a great starting point. For more control, a mirrorless or DSLR camera with a kit lens works excellently.
Tripod: Any stable tripod with adjustable height. Look for one with a fluid head for smooth movement.
Lighting: A ring light or two softbox lights are affordable and beginner-friendly. For advanced setups, LED panel lights with adjustable color temperature give you the most flexibility.
Microphone: A clip-on lapel mic for under PKR 10,000- 20,000 is a great entry point. As you grow, invest in a directional shotgun mic or a USB condenser mic.
Memory card and power: Use a high-speed SD card and keep your camera plugged in or battery fully charged. Nothing is worse than running out of power mid-recording.
Moreover, if you are setting up a home studio for YouTube videos in Lahore or anywhere in Pakistan, Hope Enterprises provides professional camera setup and production support. From equipment consultation to full studio builds, our team helps creators and businesses produce content that looks and sounds great from day one.
Final Thoughts
Knowing how to set up camera for YouTube is honestly one of the best investments you can make as a creator. For more guidance on growing your channel beyond the technical setup, explore YouTube's official Creator Academy, a free resource built by YouTube itself. It does not take a big budget. It takes the right knowledge and a little patience.
Start with what you have. Get your eye level right. Face your light. Improve your audio. Then build from there. Every top creator you watch started with a basic setup. They improved step by step. You can do the same.
In conclusion, if you want professional guidance, or you are setting up a production space and do not want to figure it all out alone, Hope Enterprises is here to help. We work with creators, businesses, and brands to build setups that deliver real results.
Start filming. Your audience is waiting.